2023-08-17

Weird outbound AWS traffic discovery


Summary:

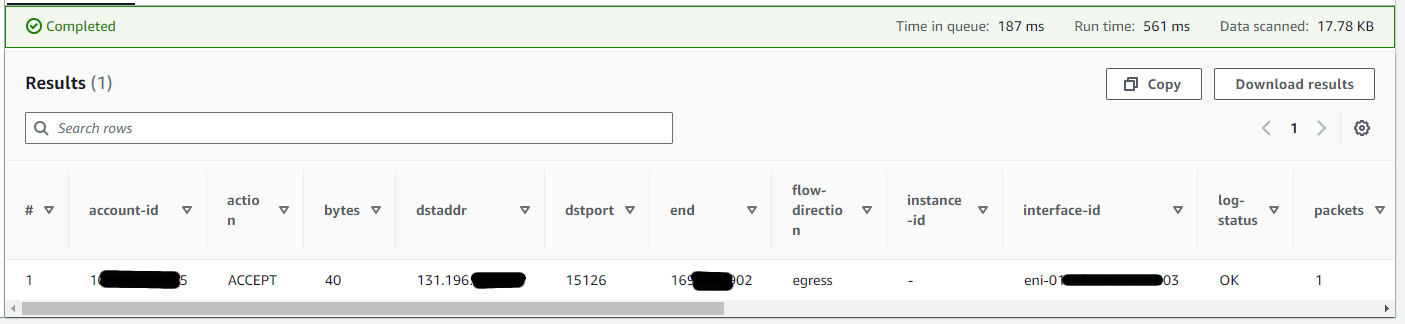
It has come to my attention that AWS sometimes generates weird, unexplained traffic - when we first noticed it, it appeared to be mostly rDNS queries, but further investigation has shown it's far more than that. In fact - rDNS isn't even the typical traffic seen. We're seeing this from accounts/instances that have no resources which should be capable of generating said traffic, and it's frequently (but not always) 40 bytes of source traffic.

TL;DR: AWS generating weird 40-byte packets with no discernible cause/source/reason
EDIT: This appears to be due to a quirk in how AWS logs things. Jump to the end for more details.


Disclaimers:

This is a joint discovery with Alex Heacock, and he's basically done all the work on this, including coming up with the first and second versions of the "steps to reproduce", first and second version of the YAML file, and working with AWS Support to see if we can figure out what's going on. I have written and tested this final version of the "steps to reproduce" in my own personal AWS account and confirmed the behavior observed.

Disclaimer: I am a nobody. (Alex is smart though.) It could be we're missing something obvious, but the fact that it can be reproduced so easily and has no obvious explanation, seems somewhat concerning. Speculation has ranges from worst-case (AWS rootkit?) to the more benign (Athena logs pulling in traffic from other VPC resources on the same hardware?).

Prerequisites:

  • AWS account
  • Payment setup in AWS account
  • Willingness to spend ~$32/month as long as you leave the stack up

Steps to reproduce:

  1. Login to AWS and go to CloudFormation
  2. Click "Create Stack"
  3. Set radio button: "Template is ready"
  4. Set radio button: "Upload a template file"
  5. Browse to "vpc_flow_log_test2.yml" (provided below)
  6. Click "Next"
  7. Stack name: "weird-aws-traffic-test" (or your preference)
  8. Click "Next"
  9. Check the box "I acknowledge that AWS CloudFormation might create IAM resources."
  10. Click "Submit"
  11. Refresh a few times to watch progress
  12. Go to Resources tab; confirm all show CREATE_COMPLETE with green/white checkmark/circle
  13. Open Athena
  14. Set radio button: "Query your data"
  15. Click "Launch query editor"
  16. If you don't have an s3 bucket with Athena setup already, follow steps 17-21. Otherwise, you might be able to continue at step 22.
  17. On the banner "Before you run your first query, you need to set up a query result location in Amazon S3." Click "Edit settings"
  18. Click "Browse S3"
  19. Click the radio button for the name that matches step 7 (like: weird-aws-traffic-test-vpcblahblah)
  20. Click "Choose"
  21. Click "Save"
  22. Click "Editor" tab again
  23. Paste query (provided below)
  24. Click "Run"
  25. If you don't see any traffic, wait an hour or two and try again.
  26. Repeat steps 24-25 until you see something. Odd traffic is "egress" though there's no resources spun up that should be generating. Appears to be DNS, possibly rDNS, considering it's port 53
  27. Done! It's like watching fish in an aquarium.

Steps to cleanup:

  1. Login to AWS and go to CloudFormation
  2. Click the radio button next to the stack you created
  3. Click "Delete"
  4. Click "Delete" again.
  5. Wait a few minutes; refresh the page to confirm deleted.
  6. Done!

Conclusion:

I don't have a conclusion at this point. Hopefully someone can provide some explanation for why this happens.

EDIT: After some time back-and-forth with AWS Support regarding this, we were told these are RST packets. AWS VPC flow logs do not contain TCP flag data when using Version 2 - the version in use that prompted us to notice this. Apparently, another quirk of this version, is that if an unexpected SYN-ACK packet is received, and the VPC responds with an RST packet (as it should, per RFC 793), then the AWS logs the RST packet it sent, but not the SYN-ACK packet that triggered it. Thus, the VPC appears to be sending packets to the source of the SYN-ACK packets entirely unprompted (even though it's not.)


Resources:

YAML file:
Pastebin link: here

Athena query:
SELECT * FROM "vpc_flow_logs_db"."vpc_flow_logs_table"
WHERE srcaddr LIKE '10.0.0.%'
AND action='ACCEPT'
ORDER BY day DESC
limit 10000;

2017-05-10

Programming Extron HTML for reading projector statuses

Note: I intended to publish this a while back. It's now mostly obsolete, but can explain a little more about the SSI stuff mentioned here.

In what amounts to a sort of follow-up to my projector control pages, I have recently been working on some code to do the following:

  1. Show statuses in a pretty, end-user-friendly format.

That's it!

Okay... while the above *is* true, the actual process is a bit more involved:
  1. Grab the status from the Extron box via Server-Side Includes
  2. Have a script on a server somewhere that runs every few seconds, and dumps the statuses from all the Extron boxes in the building, into one big file.
  3. Have another script go through and analyze this file, pull out the relevant information, and spit out JavaScript code based on what it finds
  4. Have webpages that, via polling, update every few seconds to grab the latest version of this JavaScript and display it to the end user

I'm sure much of this could be done more efficiently, but I'm at the stage where I just want to get it "working", and then I can focus on optimizations, better code, and maybe put everything into one massive script that talks directly with the client web browser via AJAX calls and such.

Time for a little more detail...
On pages 4-19 to 4-24 of this manual, there's talk about these Server Side Includes, or SSI, code that can do magical things. The biggest downside is that once you upload an HTML file with SSI code, you can't re-download it (or right-click, view source) to reverse-engineer how it works - because it (the Extron box) actually changes the HTML code of the webpage. This is a feature, not a bug - it's part of how the SSI functionality works.

All of my code is on Github, as usual - and it's very much still a work-in progress. Reading through the relevant parts of the manual (as referenced above), it seems that one's missing something - a feeling of "that's it?", but no... that's it! It's quite magical to upload a webpage that is only a few lines long, but outputs very useful status information. I discovered that, if you don't care about formatting, you can just name the file something ending in ".html", and Extron will happily treat it as valid SSI, provided you use their syntax properly.

2016-08-06

Projector statuses page

I just recently got v0.1.0 of our new projector statuses page working... mostly. Here's the rundown:
  • Extron boxes use this thing called "SSI", or "Server Side Includes", to generate the data I need. It's actually rather well-documented, despite it only being a couple pages worth of information. See the manual, starting about halfway down page 4-19.
  • A Bash/wget script takes all of that data, and dumps it into one big file.
  • A Perl script goes through and parses the data, and spits out JavaScript.
  • Client-side browser code constantly runs/reloads the JavaScript.

Now, you might be wondering why I didn't use "real" AJAX, or push from the server, or do it this way or that way. The answer is simple: I'm not that smart yet. I'd love to, and I welcome suggestions. I just wanted to make it work for now, and I'll figure out how to improve it later.


At a glance, this gives us the following information:
  • What projector it is
  • Whether that projector is on, off, or something else ("cooling down", "error", etc.)
  • How many hours are on each lamp. (Most professional-grade projectors have some sort of monitoring of "lamp hours", as a lifespan/life-remaining indicator.)
  • A colorful dot that summarized the status (green = on, red = off, other colors = other things).
It's still buggy right now. I need to tweak some code, as the page doesn't always display the statuses properly. But it's a step in the right direction, and I'm excited for what's next.
Edit: Most of the bugs have been sorted, and I think it's as good as it's going to get. (2016-10-15)

As is typical for me, the code is all on Github. See the notes file if you want a more in-depth look at how everything fits together.

2015-01-28

Projector control pages

Long time between posts! I've been meaning to compose this particular entry for a while, but have been swamped with other projects. Now that I've got most stuff under control, I figured I'd put in the effort to do a proper write-up.

Back in 2012 I started working at Lutheran Church of Hope in West Des Moines, Iowa. I was a general-purpose base-level technician; now, I have the utmost privilege of working on many aspects of some of our various mission-critical systems.

One task that was placed in front of me, was to see if there was a way to control projectors from a web browser. I knew there was a way, it was just a matter of "what will it take". At the time, we were using wired remotes as the primary method of controlling them. (Being pro-grade projectors, they were wired/wireless "hybrid" remotes. They had IR LEDs, as well as a TRS port. The TRS port talked serial to the projector, while the IR LEDs would work as standard IR-based remotes do. We had them wired, as many projectors were in locations that would make IR communication impractical at best.)

Eventually, we purchased some devices from Extron, that each came to be known colloquially as an "Extron box". They're little rackmountable things that can talk RS-232 and TCP/IP.

At this point, a little bit of background on Extron might be useful. Extron makes (among other things) these Extron boxes that are designed for control and automation of pretty much anything that can talk serial. They're often used in colleges for control of all sorts of A/V systems, including projectors, screens, TVs, digital signage, DVD players, et cetera. They're designed to be used with an ActiveX webpage, little panels with buttons, and a handful of other control devices. The ActiveX webpage can be slightly customized, and can be used for controlling, as well as viewing the status of, anything the Extron boxes can talk to via a driver. Extron has a plethora of drivers available. If the one you need doesn't exist, just tell them, and they'll make one for you. Makes sense as to why they're so popular with colleges.

Anyhow, back at work. We (the Production department) are very much Mac-based, so anything ActiveX was out of the question as a primary means of communication. This is where I come in.

After scouring the Extron documentation, as well as the documentation for the projectors I was attempting to control, I came across a solution: bypass the driver. That's right - instead of trying to spoof ActiveX requests, as I thought I might need to do, I could use the Extron boxes as a dumb TCP/RS-232 bridge of sorts. After figuring out the syntax, it was a simple matter of adding the serial command at the right spot at the end of a GET request.

Eventually, while functional, we wanted something more. Now, we have full-blown projector control pages that look good, work well, and have yet to fail us. They use JavaScript to issue the GET requests, so the user never leaves the webpage they're on. (It uses a function that uses the XMLHttpRequest() function.)

Below I've included a few screenshots; not all of these are on Extron boxes, but they all use JavaScript and CSS to accomplish their task. The ones that aren't on Extron boxes are no fun to work with; that's a story for another time, if it becomes a requested talking point.


All our current code is on Github; I just recently went through and started refactoring all our existing JavaScript to utilize a more scalable method. Previously, we had been setting every button to an anchor tag with an href of the form http://SOME_IP_ADDRESS/remote-control.html?cmd=W01RS|SERIAL_COMMAND_DATA, whereas now, they all use the form extronBox (roomInBuilding, whichProjector, projectorBrand, actionToPerform). The magic all happens in this file; feel free to have a look. I plan to maintain this as a rather generic file to be used for any given Extron box/connected device pairing; comments/suggestions are welcome.


Screenshots:


Some specifics, for those curious:

  • the Extron syntax is http://ip-address/filename/cmd=W[port]RS|[data] for RS-232.
    • Many of our extron boxes have several ports; W01RS would specify "RS-232 port 1", W02RS would specify "RS-232 port 2", etc.
    • the "data" is pretty much verbatim. You can, however, encode binary data by using URL encoding. For example, "%0D" is a carriage return.
  • All the parameters passed to the extronBox() function can either be variable names, or a string (if the string is enclosed in quotes).
  • The function needs to be able to handle variable names as input, so the variables intended for use all have a default value; the default value is basically the string you type when you type the variable. (Examples: bridge == 'bridge'projector_on == 'projector-on'.)
  • Flow of the extronBox() function is as follows:
    • First, populate the variables with more meaningful content than is default. Based on what room we pass to the function, the populateVars() function determines what to set the other variables to. For example, let's say the Bridge's center projector is connected to port 3. populateVars() could set projector_center to '03'
    • After that, determine the device-specific commands. Example: Sanyo projectors have an "off" command of "C01". Using a switch-case block, the command variable is set to 'C01' if the action to perform is power_off.
      • Since Sanyo projectors all like a carriage return after every command, there's a little bit of code right after the switch-case block to add '%0D' to every command string, before it gets sent to the Extron box.
    • Finally, the full string (the URL) is assembled, and the httpGet() function is used to make an AJAX request to the Extron box, executing the requested command.

This work has greatly simplified building projector control pages for me; I hope others might find it useful someday.


2014-12-14

Data, data everywhere!

A few days (weeks?) ago, I went to backup my Windows drive. Simple enough, right? Unless you're an idiot like me, and somehow borked something to the point that the Clonezilla storage drive you're using won't save it anymore, even thought it has plenty of free space.

Time to transfer the contents of that drive to the 2TB RAID1 array. Oh wait... never got around to fixing the server. It's still running as two gimped partitions, neither of which have enough space, though the 2TB isn't nearly full.

Time to fix that... except it contains the only "known good" copy of the data. After using "rsync" to backup to an external drive, as is my backup procedure (terrible, I know), it was time to get to work.

Except I forgot how I setup my server. I knew it wasn't pretty, but I didn't document it. I figured it was set-and-forget. How right I was. I haven't had any issues with it (thanks, Debian!), but I also forgot how to use it.

Fortunately, I'm a Debian-family Linux dude, so it didn't take me too long (with Google's help, of course) to figure out. I used "mdadm" and "lvm" on my Xen host, and did everything else (mounting and serving) from a Xen guest.

Then, I had issues transferring everything back. Several days later, all was back to normal.

I still need to back up my Windows drive.

2011-03-31

Intriguing Interactive Google Doodle for Robert Bunsen

I don't often make a big deal out of the Google Doodles, but I found the Doodle currently in use to be especially intriguing for a few different reasons. Though Google has used interactive Doodles in the past, this one is (to my knowledge) more subtly sophisticated than the rest. At first glance, it may simply appear to be animated. However, a closer look shows otherwise.

Moving the mouse back and forth across the screen, I noticed that the flame changes color gradually. (I'm using a maximized Google Chrome window on my Ubuntu installation, but I suspect that it will work the same with any modern browser.) I am guessing that this somehow corresponds to the different colors of flame produced when different chemicals are burned, but I don't know for sure - chemistry is definitely one of my weaker areas of physical science.

Also, moving the mouse up and down heightens or shortens the flame correspondingly; due to the increase or decrease of heat that this would produce in a real-life setup of a system like the one depicted, the overall activity of the system shown in the Doodle increases with the larger flame, and decreases with the smaller flame. For me, it was initially the blue liquid moving from place to place through the coiled structure that caught my attention, and helped me realize this was actually a more interactive Doodle, rather than a sophisticated-but-static animation, as I remember the one for Rube Goldberg as being (though now I question that recollection).

That's all for now; awesome stuff, keep it up, Google!

2010-08-20

How to: Download templates from Avery (without providing your information)

Today I was looking for a template to use with some business card paper from Avery. Upon trying to download the template, I realized that it wouldn't let me without me giving it a valid email address. I really didn't want to, but I did anyways. Now, I'm writing this so that others that might happen to read it won't have to worry about giving Avery their personal information.

First, you need to figure out what template you want. Once you have done that, get to the part where it asks for your name and email address. Then, copy the text that's in the address bar of that window. (On Chrome, this wasn't an issue, but when I tried it in Firefox, the form requesting my information opened in a separate window, which made this part necessary.)

Here's where things start to get fun (and maybe somewhat tricky). Paste the text you copied from the address bar of the form's window into a new tab or window, but don't press [Enter] or go to the URI (yet); it needs to be modified to bypass the name and email form.

Look at the URI, and it should start out similar to this:
"http://www.avery.com/avery/secure/us_softwaredownload?locale=en_us&downloadId="

Depending on where you are trying this from, the part that says:
"us_softwaredownload?locale=en_us"
might be different. Regardless, this is the part between the first ampersand and the last forward-slash before it; this is also the part that needs to be modified.

Change it to:
"downloadprogress?tyurl="
and press the [Enter] key, click "Go"/an arrow, or whatever else you use to go to the URI. You should get the download page for the template you wanted; it should say "Downloading..." (or something similar), and provide a link to click if the download doesn't start automatically.

If you do try this, I'd appreciate a comment letting me know whether or not it worked for you. Thanks!